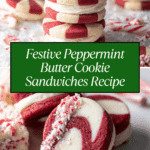
Peppermint Butter Cookie Sandwiches Recipe
If there is one treat that brilliantly captures both the festive spirit and a melt-in-your-mouth texture, it has to be Peppermint Butter Cookie Sandwiches. These little bites of joy combine rich, creamy butter cookies swirled with merry red and white colors, perfectly paired with a dreamy peppermint buttercream center. They are truly irresistible, offering a burst of refreshing peppermint flavor balanced with the soft, buttery cookie that’s crisp on the edges and tender in the middle. Whether you’re gearing up for holiday celebrations or simply want to brighten up your dessert tray, these sandwiches are guaranteed to bring smiles and maybe even a little dance of delight.

Ingredients You’ll Need
Before you dive in, it’s wonderful to know how simple yet thoughtfully chosen ingredients create this magical treat. Each one plays a vital role, from enriching the dough’s texture to adding peppermint’s cool zing that makes these cookies stand out.
- Unsalted butter: The backbone of both cookie dough and frosting, providing luscious richness and moisture.
- Powdered sugar: Essential for that smooth, sweet bite in your cookies and the decadent buttercream.
- Salt: Just a touch to balance all the sweetness and enhance the buttery flavor.
- Egg: Adds structure and tenderness to the cookie dough for a perfect crumb.
- Vanilla extract: A subtle background note that deepens the overall flavor profile.
- All-purpose flour: The foundation that frames the dough, sifted to keep the texture light and tender.
- Peppermint extract: The star of the show infusing bold, festive freshness into both dough and frosting.
- Red food coloring or beet powder: To bring the joyful red hue, whether you prefer natural or classic coloring.
- Heavy cream or milk: Helps frostings stay creamy and spreadable without losing their fluffiness.
- Crushed peppermint candies: Adds a delightful crunch and festive finish when rolled around the cookies.
How to Make Peppermint Butter Cookie Sandwiches
Step 1: Prepare Two Half-Batches of Cookie Dough
Start by dividing your dough preparation into two halves—one plain and one tinted with that lovely red color (either food coloring or natural beet powder). Beat half the butter with powdered sugar and salt until creamy, then add in half the egg, vanilla, and peppermint extract. Gently mix in the flour until just combined. Repeat for the second batch, adding your coloring to bring in that cheerful red. This dual-dough approach gives you the iconic peppermint swirl look.
Step 2: Shape Dough Logs and Chill
Once mixed, knead each dough half lightly on a floured surface and shape into logs about 1.5 inches thick. Wrapping them tightly in plastic wrap is crucial before refrigerating for 1–2 hours. This chilling step firms up the dough, making it easier to slice into clean, sharp shapes for that signature compact sandwich.
Step 3: Slice and Assemble Swirled Dough Logs
When firm, carefully slice each log in half lengthwise, then make V-shaped cuts to create triangle pieces. Alternating red and white triangles, assemble two new logs and gently smooth them together. Rolling and slicing these logs into thin rounds will reveal that mesmerizing peppermint swirl pattern that makes Peppermint Butter Cookie Sandwiches so visually stunning.
Step 4: Bake to Golden Perfection
Lay your cookie rounds spaced out on parchment-lined pans and bake in a preheated oven at 350°F (180°C) for about 10–12 minutes. The cookies should become slightly golden on the edges while remaining soft and bright in the center. Cool them thoroughly before the next delicious stage.
Step 5: Whip Up the Peppermint Buttercream Frosting
Beat softened butter until light, then gradually add powdered sugar, followed by heavy cream and peppermint extract. This frosting is creamy, fluffy, and full of that perfect minty pop that contrasts beautifully with the buttery cookie.
Step 6: Assemble the Peppermint Butter Cookie Sandwiches
Pipe or dollop frosting on the flat side of half the cookies, then gently sandwich them with the remaining cookies. For a delightfully festive touch, roll the frosted edges in crushed peppermint candies to add crunch and sparkle.
How to Serve Peppermint Butter Cookie Sandwiches

Garnishes
To make your Peppermint Butter Cookie Sandwiches even more festive, consider sprinkling some finely chopped peppermint candies or edible glitter on top of the frosting before rolling in crushed peppermint. Fresh mint leaves or small candy canes as plate decoration add a charming holiday vibe that elevates your presentation.
Side Dishes
Pair these sandwiches with warm drinks like hot cocoa, peppermint tea, or a rich cup of coffee. The warmth contrasts beautifully with the cool mint flavor, making every bite even more indulgent. A scoop of vanilla ice cream on the side also complements their rich buttery texture wonderfully.
Creative Ways to Present
Try stacking these sandwiches in a pretty glass jar tied with a red ribbon for gifting, or arrange them on a tiered dessert stand at a holiday party. You can also drape a small peppermint candy cane hung with a ribbon over the assembled plate to add an extra festive touch.
Make Ahead and Storage
Storing Leftovers
Leftover Peppermint Butter Cookie Sandwiches keep beautifully in an airtight container at room temperature for up to 5 days, allowing you to savor their freshness without drying out. Just make sure they’re kept away from direct heat or sunlight to maintain their texture and flavor.
Freezing
If you want to keep these peppermint delights for longer, freeze them in a single layer on a baking sheet first, then transfer to a freezer-safe container or bag. They stay wonderful for up to 2 months. Thaw them overnight in the refrigerator before serving to keep the frosting smooth.
Reheating
Because these treats are best enjoyed cool or at room temperature, reheating is generally not necessary. If you prefer a slightly softened frosting, you can leave them out for about 20 minutes before enjoying. Avoid microwaving to prevent the buttercream from melting too much.
FAQs
Can I use artificial peppermint flavor instead of natural extract?
Yes, artificial peppermint flavor can be used if that’s what you have on hand. Just remember that natural peppermint extract tends to provide a fresher, more authentic taste, which really elevates these cookie sandwiches.
What if I don’t have red food coloring? Can I skip it?
Absolutely! You can simply make both dough batches plain or use beet powder as a natural alternative for that lovely red tint. The flavor remains wonderful either way, and you’ll still get tasty, festive cookies.
How do I prevent the cookie dough from becoming too dry?
If your dough feels crumbly during mixing, add water one teaspoon at a time to help bind it without making it sticky. The dough should be soft and stick well together when pressed between your thumbs.
Can I make these cookies vegan or dairy-free?
To make a vegan version, substitute butter with a plant-based margarine or coconut oil and use a flax egg instead of a chicken egg. Be sure your peppermint extract and crushed candies are vegan-friendly. Texture and flavor will differ slightly but still yummy!
What’s the best way to get the perfect swirl in Peppermint Butter Cookie Sandwiches?
The key is chilling your dough well and carefully assembling alternating colored triangles before re-rolling into logs. Slice the logs at a slight twist to keep them round and let the swirl shine through beautifully during baking.
Final Thoughts
Baking Peppermint Butter Cookie Sandwiches is a joyful experience that ends with a truly show-stopping treat. Their perfect balance of buttery softness, peppermint brightness, and festive colors makes them a beloved favorite for sharing with friends and family. I wholeheartedly encourage you to give this recipe a try—you’ll find it brings both sweetness and a sprinkle of holiday magic to your kitchen.
PrintPeppermint Butter Cookie Sandwiches Recipe

Delight in the festive charm of Peppermint Butter Cookie Sandwiches featuring buttery, peppermint-infused cookies with alternating red and white dough logs, filled with a creamy peppermint buttercream and rolled in crushed peppermint candies. Perfectly tender and bursting with minty freshness, these cookies make a wonderful holiday treat or a refreshing everyday indulgence.
- Prep Time: 30 minutes
- Cook Time: 12 minutes
- Total Time: 2 hours 42 minutes (including chilling time)
- Yield: Approximately 48 cookie sandwiches 1x
- Category: Dessert, Cookies
- Method: Baking
- Cuisine: American
- Diet: Vegetarian
Ingredients
Cookie Dough
- 1 3/4 sticks (200g) unsalted butter, softened to room temperature
- 1 cup (115g) powdered sugar
- 1/4 teaspoon salt
- 1 large egg (50ml), whisked
- 1 teaspoon pure vanilla extract
- 2 cups plus 2 tablespoons (300g) all-purpose flour, sifted
- 2 teaspoons peppermint extract
- 1 teaspoon red food coloring or 1/2 Tablespoon beet powder (for natural red color, add to half the dough)
Buttercream Frosting
- 1 stick (8 Tablespoons, 113g) unsalted butter, softened to room temperature
- 2 cups powdered sugar
- 2 teaspoons heavy cream or milk
- 1 teaspoon peppermint extract
- 1/3 cup crushed peppermint candies, for rolling
Instructions
- Prepare Half-Batches of Dough: Divide ingredients into two halves. For the first half, beat half the butter, powdered sugar, and salt until creamy. Add half egg, half vanilla, and 1 teaspoon peppermint extract, then mix in flour until just combined. Repeat for second half adding red food coloring or beet powder for natural color before flour.
- Shape and Chill Dough Logs: Work each dough half on a floured surface into smooth logs about 1.5 inches diameter. Wrap in plastic and chill at least 1-2 hours until firm.
- Cut and Form Patterned Logs: Slice each chilled log lengthwise to form halves, then cut each half into three triangle-shaped slices by making angled cuts. Alternate red and white pieces to form two new logs, gently pressing and rolling smooth.
- Slice Cookies: Cut the reassembled logs into 1/4-inch thick rounds, rolling a quarter turn between each slice for even shape. Chill if dough softens to maintain shape.
- Bake Cookies: Arrange cookie rounds 1-2 inches apart on parchment-lined sheets. Bake at 350°F (180°C) for 10-12 minutes until edges are golden but centers remain bright and soft. Cool on pan 10 minutes then on wire rack.
- Make Peppermint Buttercream: Beat softened butter until light and fluffy. Gradually add powdered sugar, then cream and peppermint extract, mixing until smooth.
- Assemble Cookie Sandwiches: Pipe 1-2 teaspoons frosting onto half the cookies, top with remaining cookies gently pressing to spread frosting evenly. Roll cookie edges in crushed peppermint candies.
- Store Properly: Keep assembled cookie sandwiches in an airtight container at room temperature for up to 5 days or refrigerated for up to 2 weeks. Freeze up to 2 months; thaw to room temperature before serving.
Notes
- Use beet powder if you prefer a natural dye instead of red food coloring.
- If dough is crumbly, adding 1-2 teaspoons of water can help bind it.
- Chilling the dough logs before slicing helps maintain cookie shape.
- Rolling logs a quarter turn after each slice creates round, uniform cookies.
- Cookies are best served at room temperature for maximum flavor and texture.
- Store in airtight containers to maintain freshness and prevent dryness.
Nutrition
- Serving Size: 1 cookie sandwich (2 cookies with frosting)
- Calories: 210
- Sugar: 18g
- Sodium: 55mg
- Fat: 12g
- Saturated Fat: 7g
- Unsaturated Fat: 4g
- Trans Fat: 0g
- Carbohydrates: 25g
- Fiber: 0.5g
- Protein: 2g
- Cholesterol: 30mg
Keywords: peppermint butter cookies, holiday cookies, peppermint cookie sandwiches, Christmas cookies, peppermint buttercream, festive cookies