Paper Bag Apple Pie Recipe
Introduction
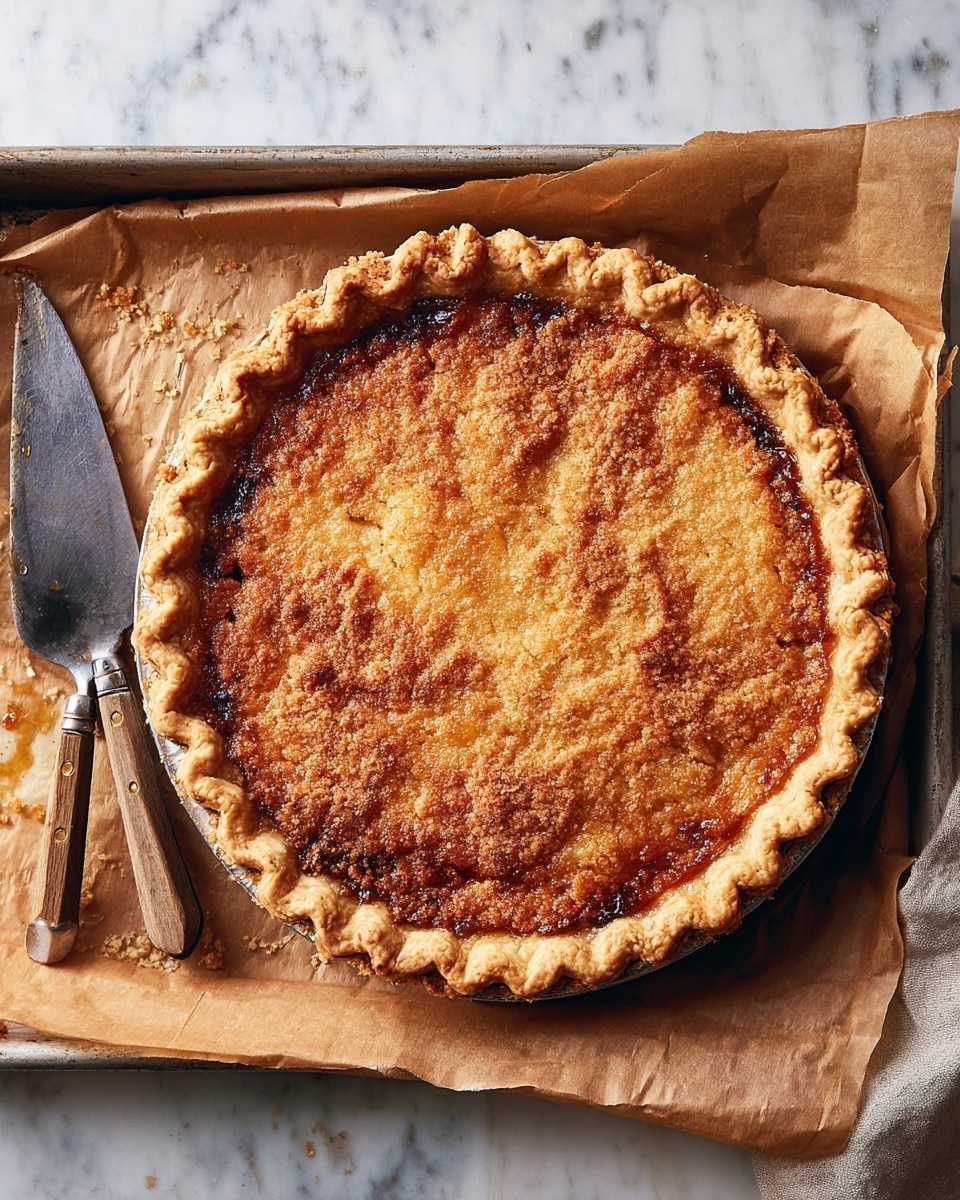
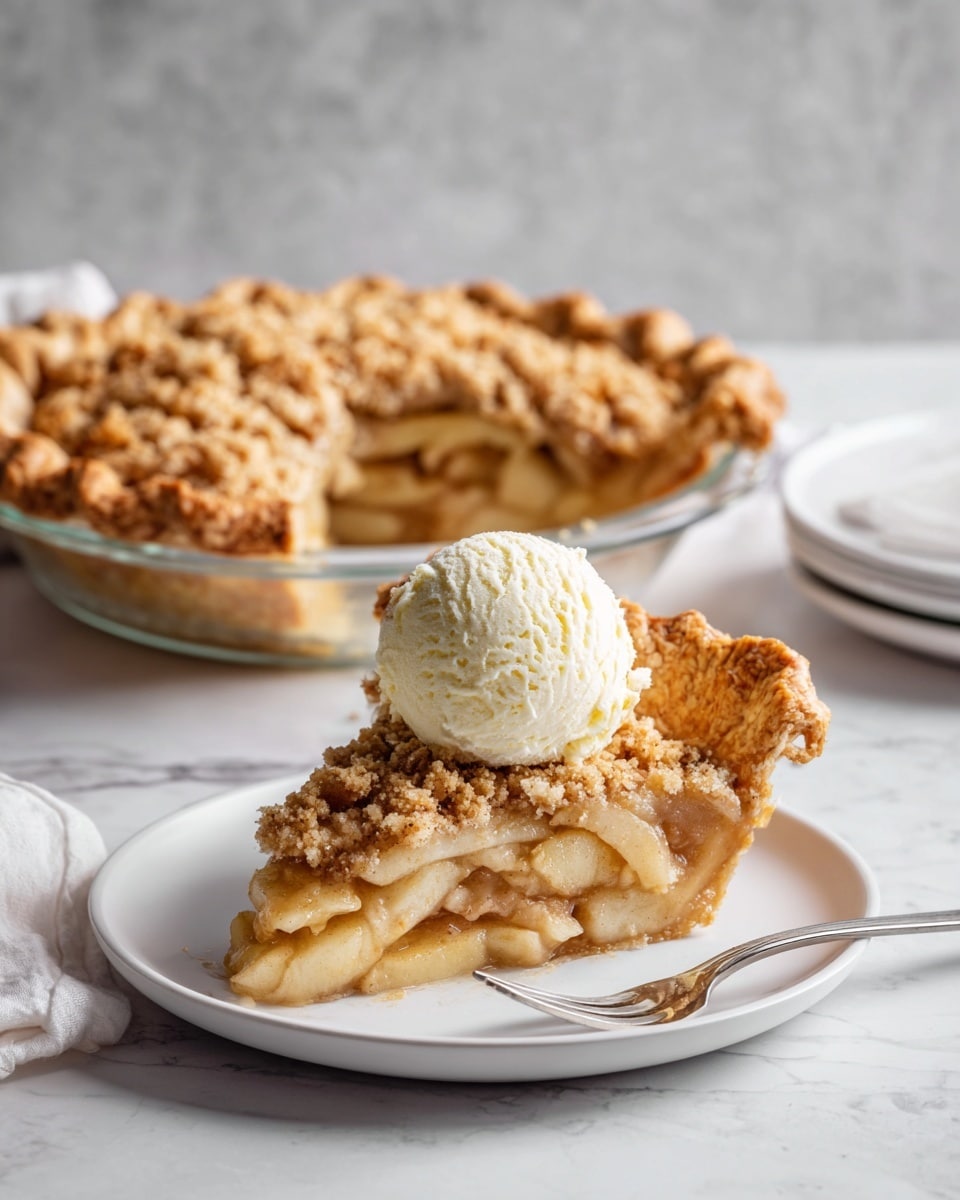
Paper Bag Apple Pie is a delightful twist on a classic dessert that creates a tender crust and juicy filling using a simple baking technique. Baking the pie inside a paper bag helps it cook evenly, resulting in a golden, crumbly topping and perfectly softened apples. This recipe is approachable for home cooks looking to impress with a comforting treat.
Ingredients
- 1 1/4 cups (141g) King Arthur Pastry Flour Blend or 1 1/4 cups (150g) King Arthur Unbleached All-Purpose Flour
- Heaping 1/4 teaspoon table salt
- 3 tablespoons (35g) vegetable shortening
- 4 tablespoons (57g) unsalted butter, cold, cut into 1/2″ pieces
- 4 to 5 tablespoons (57g to 71g) ice water
- 3 1/2 to 4 pounds (1588g to 1814g) apples, peeled, cored, and sliced (about 8 cups)
- 3/4 cup (159g) light or dark brown sugar, packed
- 1 teaspoon cinnamon
- 1/4 teaspoon table salt
- 1/2 teaspoon nutmeg
- 2 tablespoons (28g) lemon juice
- 2 tablespoons (39g) boiled cider (optional)
- 3 tablespoons (21g) King Arthur Unbleached All-Purpose Flour or 1/4 cup (46g) King Arthur Pie Filling Enhancer
- 1/2 cup (99g) granulated sugar
- 1/2 cup (60g) King Arthur Unbleached All-Purpose Flour
- 8 tablespoons (113g) unsalted butter, cold, cut into pats
Instructions
- Step 1: To make the crust, whisk together flour and salt in a bowl. Work in the shortening until well combined, then add the cold butter, mixing until the mixture is unevenly crumbly with some larger butter pieces remaining.
- Step 2: Add ice water one tablespoon at a time, stirring as you sprinkle water onto the flour and fat. When the dough holds together when squeezed, transfer it to a lightly floured surface.
- Step 3: Knead the dough three or four times to bring it together, then pat into a thick disk. Roll the disk on its edge to smooth the edges, wrap in plastic, and refrigerate for 30 minutes.
- Step 4: For the filling, place sliced apples in a large microwave-safe bowl. Stir in brown sugar, cinnamon, salt, nutmeg, lemon juice, and boiled cider if using.
- Step 5: Microwave the filling uncovered for 5 minutes to soften the apples and release juices (optional but recommended). Stir in the flour or Pie Filling Enhancer.
- Step 6: Preheat the oven to 425°F (220°C).
- Step 7: Remove the crust from the refrigerator. If chilled longer than 30 minutes, let it warm slightly. Roll into a 12 1/2″ to 13″ circle.
- Step 8: Lightly grease a 9″ deep pie pan and gently lay the crust inside, avoiding stretching.
- Step 9: Spoon the apple filling into the crust.
- Step 10: To make the topping, combine granulated sugar, flour, and cold butter. Mix until crumbly but not a solid mass.
- Step 11: Spread the streusel topping evenly over the filling.
- Step 12: Place the pie inside a brown paper grocery bag. Secure the bag closed with staples or uncoated paper clips, then set it on a baking sheet.
- Step 13: Bake the pie for 1 hour.
- Step 14: Carefully remove the pie from the oven and open the bag cautiously to avoid steam. Transfer the pie to a rack and cool for at least 30 minutes before slicing.
Tips & Variations
- If you’re wary of baking in a paper bag, try using a large piece of parchment paper instead to enclose the pie.
- Boiled cider adds a warm, tangy depth but can be omitted or substituted with apple cider vinegar for a different twist.
- Use a mix of tart and sweet apples for a more complex filling flavor.
- Chilling the dough before rolling helps prevent shrinking and cracking during baking.
Storage
Store leftover pie tightly covered at room temperature for up to 2 days or refrigerated for up to 4 days. Reheat slices gently in a microwave or warm in a 350°F oven until heated through, about 10 minutes.
How to Serve
Serve this delicious recipe with your favorite sides.
FAQs
Why bake the pie inside a paper bag?
Baking in a paper bag traps moisture, helping the crust stay tender while allowing the filling to cook evenly. It also reduces the risk of burning the crust edge before the filling is done.
Can I prepare the dough and filling ahead of time?
Yes, you can prepare the crust and filling a day ahead. Keep the dough wrapped and chilled, and store the filling refrigerated. Assemble and bake the pie when ready.
PrintPaper Bag Apple Pie Recipe

This Paper Bag Apple Pie is a delightful twist on the traditional apple pie, featuring a tender, flaky crust and a luscious spiced apple filling. The unique baking method inside a brown paper bag helps create a perfectly baked pie with a golden streusel topping, locking in moisture and flavor. Perfect for fall or anytime you crave a comforting homemade dessert.
- Prep Time: 40 minutes
- Cook Time: 1 hour
- Total Time: 1 hour 40 minutes
- Yield: 1 9-inch pie, serves 8 1x
- Category: Dessert
- Method: Baking
- Cuisine: American
Ingredients
For the Crust:
- 1 1/4 cups (141g) King Arthur Pastry Flour Blend or 1 1/4 cups (150g) King Arthur Unbleached All-Purpose Flour
- Heaping 1/4 teaspoon table salt
- 3 tablespoons (35g) vegetable shortening
- 4 tablespoons (57g) unsalted butter, cold, cut into 1/2″ pieces
- 4 to 5 tablespoons (57g to 71g) ice water
For the Filling:
- 3 1/2 to 4 pounds (1588g to 1814g) apples, peeled, cored, and sliced; enough to make 8 cups sliced apples
- 3/4 cup (159g) light brown sugar or dark brown sugar, packed
- 1 teaspoon cinnamon
- 1/4 teaspoon table salt
- 1/2 teaspoon nutmeg
- 2 tablespoons (28g) lemon juice
- 2 tablespoons (39g) boiled cider, optional but tasty
- 3 tablespoons (21g) King Arthur Unbleached All-Purpose Flour or 1/4 cup (46g) King Arthur Pie Filling Enhancer
For the Topping (Streusel):
- 1/2 cup (99g) granulated sugar
- 1/2 cup (60g) King Arthur Unbleached All-Purpose Flour
- 8 tablespoons (113g) unsalted butter, cold, cut into pats
Instructions
- Make the crust: Whisk together the flour and salt in a mixing bowl. Work the vegetable shortening into the flour mixture until fully combined. Then, work in the cold butter pieces until the mixture becomes unevenly crumbly with some larger bits of butter remaining.
- Add water: Sprinkle ice water onto the flour and fat mixture one tablespoon at a time, mixing as you go. Once the dough is moist enough to hold together when squeezed, transfer it to a lightly floured work surface.
- Knead and shape dough: Knead the dough three to four times to bring it together, then pat it into a thick disk. Roll the disk on its edge like a wheel to smooth out its edges, ensuring even rolling later. Wrap the dough in plastic and refrigerate for 30 minutes.
- Prepare the filling: In a large microwave-safe bowl, combine the sliced apples with brown sugar, cinnamon, salt, nutmeg, lemon juice, and boiled cider if using.
- Microwave filling: Microwave the apple filling uncovered for 5 minutes to soften the apples slightly and release their juices. This step is optional but recommended for better flavor integration.
- Thicken filling: Stir in the flour or Pie Filling Enhancer to help thicken the filling during baking.
- Preheat oven: Set your oven to 425°F (218°C) for baking.
- Roll out crust: Remove the dough from the refrigerator; if chilled longer than 30 minutes, allow it to rest 10 minutes. Roll it into a 12 1/2″ to 13″ circle on a floured surface.
- Place crust in pan: Lightly grease a 9″ pie pan (at least 1 1/2″ deep). Gently lay the crust into the pan without stretching or tugging to prevent shrinkage during baking.
- Add filling: Spoon the apple filling evenly over the crust in the pie pan.
- Make the streusel topping: Combine granulated sugar, flour, and cold butter pats, working them together until crumbly but not solid.
- Add topping: Spread the streusel mixture evenly atop the apple filling.
- Prepare bag for baking: Place the pie inside a clean brown paper grocery bag, then seal it securely with staples or uncoated paper clips. This traps moisture and helps bake the pie evenly.
- Bake pie: Set the bagged pie on a baking sheet and bake in the preheated oven for 1 hour at 425°F (218°C).
- Cool and serve: Carefully remove the pie from the oven and open the paper bag cautiously to avoid steam burns. Transfer the pie to a cooling rack and let it cool for at least 30 minutes before slicing and serving.
Notes
- Microwaving the filling before baking softens the apples and encourages a juicier, more integrated filling, but this step is optional.
- Using a brown paper bag for baking helps retain moisture and prevents the crust from over-browning, but if you’re concerned, baking in parchment paper is a safe alternative.
- Rolling the dough disk on its edge before rolling flat helps prevent cracks and ensures an even crust thickness.
- Cold butter in the crust and topping is essential for a flaky texture.
- Allow the pie to cool completely for the filling to set and slicing to be cleaner.
Keywords: apple pie, paper bag baking, streusel topping, homemade pie, fall dessert