No-Bake Chocolate Peanut Butter Pie Recipe
Introduction
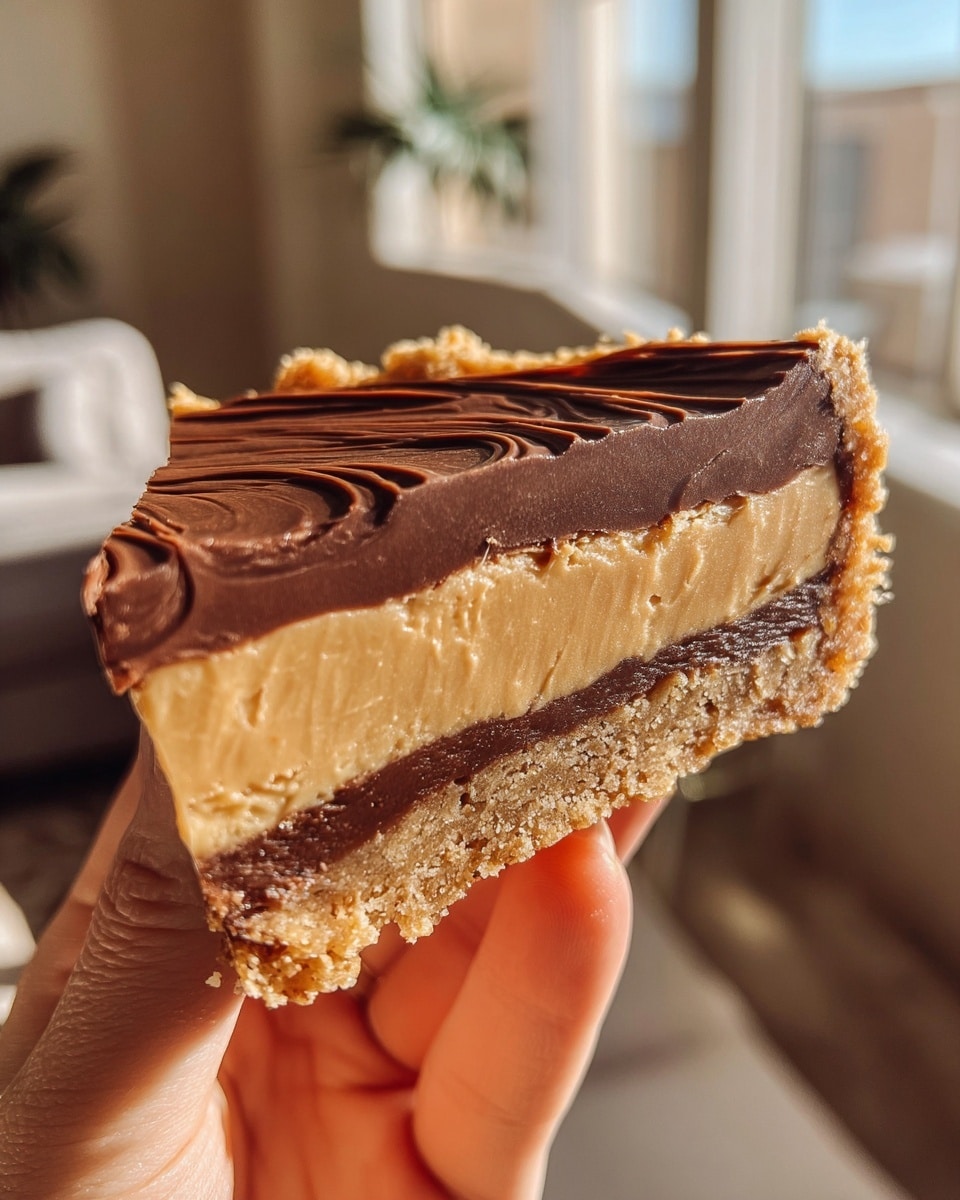
This no-bake chocolate peanut butter pie is a creamy, rich dessert that’s quick to prepare and perfect for any occasion. With a crunchy graham cracker crust and a smooth peanut butter filling topped with chocolate, it’s sure to satisfy your sweet tooth without turning on the oven.
Ingredients
- 1 ½ cups graham cracker crumbs
- ½ cup unsalted butter, melted
- 1 cup creamy peanut butter
- 1 cup powdered sugar
- 1 cup heavy whipping cream
- 1 cup chocolate chips
- 2 tablespoons milk
Instructions
- Step 1: In a bowl, mix the graham cracker crumbs and melted butter until well combined.
- Step 2: Press the crumb mixture firmly into the bottom and up the sides of a pie pan to form the crust.
- Step 3: In another bowl, combine the peanut butter and powdered sugar, stirring until smooth.
- Step 4: In a separate bowl, whip the heavy cream until stiff peaks form.
- Step 5: Gently fold the whipped cream into the peanut butter mixture until fully blended.
- Step 6: Spread the peanut butter filling evenly into the prepared crust.
- Step 7: Melt the chocolate chips with the milk in a microwave-safe bowl or over a double boiler until smooth; then pour this chocolate topping over the peanut butter filling.
- Step 8: Chill the pie in the refrigerator for at least 4 hours to set before serving.
Tips & Variations
- Use crunchy peanut butter instead of creamy for added texture in the filling.
- Substitute chocolate chips with semi-sweet or dark chocolate for a richer flavor.
- For a nut-free option, replace peanut butter with sunflower seed butter.
- Garnish the pie with chopped peanuts or chocolate shavings for extra appeal.
Storage
Store the pie covered in the refrigerator for up to 3 days. To serve, allow it to sit at room temperature for 10 minutes for easier slicing. The pie is not suitable for freezing as the texture may change upon thawing.
How to Serve

Serve this delicious recipe with your favorite sides.
FAQs
Can I make this pie ahead of time?
Yes, this pie can be made a day in advance and chilled until ready to serve, making it perfect for entertaining.
What can I use instead of graham cracker crumbs?
You can substitute crushed digestive biscuits, vanilla wafers, or even crushed pretzels for a different but delicious crust alternative.
PrintNo-Bake Chocolate Peanut Butter Pie Recipe

This No-Bake Chocolate Peanut Butter Pie is a rich and creamy dessert featuring a buttery graham cracker crust, a smooth peanut butter filling whipped with heavy cream, and a luscious chocolate topping. Perfect for those looking for an easy yet indulgent treat without the need for an oven.
- Prep Time: 15 minutes
- Cook Time: 0 minutes
- Total Time: 4 hours 15 minutes
- Yield: 8 servings 1x
- Category: Dessert
- Method: No-Cook
- Cuisine: American
- Diet: Vegetarian
Ingredients
Crust
- 1 ½ cups graham cracker crumbs
- ½ cup unsalted butter, melted
Filling
- 1 cup creamy peanut butter
- 1 cup powdered sugar
- 1 cup heavy whipping cream
Topping
- 1 cup chocolate chips
- 2 tablespoons milk
Instructions
- Prepare the crust: In a bowl, thoroughly mix the graham cracker crumbs with the melted unsalted butter until the mixture resembles wet sand. Press this mixture evenly into the bottom and up the sides of a pie pan to form a firm crust.
- Make the peanut butter filling: In a separate bowl, combine the creamy peanut butter and powdered sugar until smooth and well blended.
- Whip the cream: In another clean bowl, whip the heavy whipping cream using a mixer or hand whisk until stiff peaks form, indicating the cream holds its shape firmly.
- Combine filling and whipped cream: Gently fold the whipped cream into the peanut butter and powdered sugar mixture, taking care to maintain the light and airy texture of the whipped cream.
- Assemble the pie: Spread the peanut butter filling evenly over the graham cracker crust, smoothing the top with a spatula.
- Prepare the chocolate topping: Melt the chocolate chips together with the milk in a microwave-safe bowl or using a double boiler, stirring occasionally until silky and smooth.
- Add topping and chill: Pour the melted chocolate mixture evenly over the peanut butter filling. Refrigerate the pie for at least 4 hours, or until fully set and chilled, before serving.
Notes
- For a firmer crust, you may press the graham cracker and butter mixture into a springform pan or use a pie plate with a removable bottom.
- Use creamy peanut butter for the smoothest texture in the filling.
- When folding whipped cream into the peanut butter mixture, use a spatula and fold gently to keep the filling light and fluffy.
- The chocolate topping can be substituted with melted dark, milk, or white chocolate depending on preference.
- Chilling the pie overnight improves flavor melding and firmness.
Keywords: no bake pie, chocolate peanut butter pie, easy dessert, no bake dessert, peanut butter pie, graham cracker crust